Sunday, March 16, 2014

The Grand Finale (aka the post with all the nice fancy pictures I stole my brother's camera to take!)

So this is it!  Finally the post where I show off all the cool pictures of the finished dolls!  I'm really proud of how they turned out, and even more proud of myself for these photos.  oh and the title is slightly misleading: I didn't steal my brother's camera.  I borrowed it, having asked him a week ago if I could, and he had apparently not been paying attention when he said yes.  but after some explanation he actually took quite a few of the pictures himself for me because he's in art school and has a far better eye for artistic-like things.  anyway, story time!

so the closest Arby's is an hour away.  today we happened to be in town, so first we got lost going the wrong direction on the freeway trying to find Arby's, and then we discovered that the Arby's itself is right in this weird commercially-residential area (businesses and loft apartments alternating throughout the buildings) and as a result the parking was for select businesses or residents with parking tags only.  so we wound around a few blocks (and a little playground and some municipal buildilngs I never even knew existed) and found a highly questionable stretch of curved sidewalk near a dead end where cars were parked even though there were no signs in sight.  so my brother and I ditched the car there and ran four blocks to Arby's (me in heels of course) and found in the parking lot of the adjacent bread factory this little mini Arby's sign with a "welcome to -city name-" sign underneath.  It was only about half the height of the normal sign, so we ran into the little snowy field by the highway (me still in heels now half-buried in the snow) and got some pictures.  


what do you mean photoshop don't you know I actually live in Night Vale?
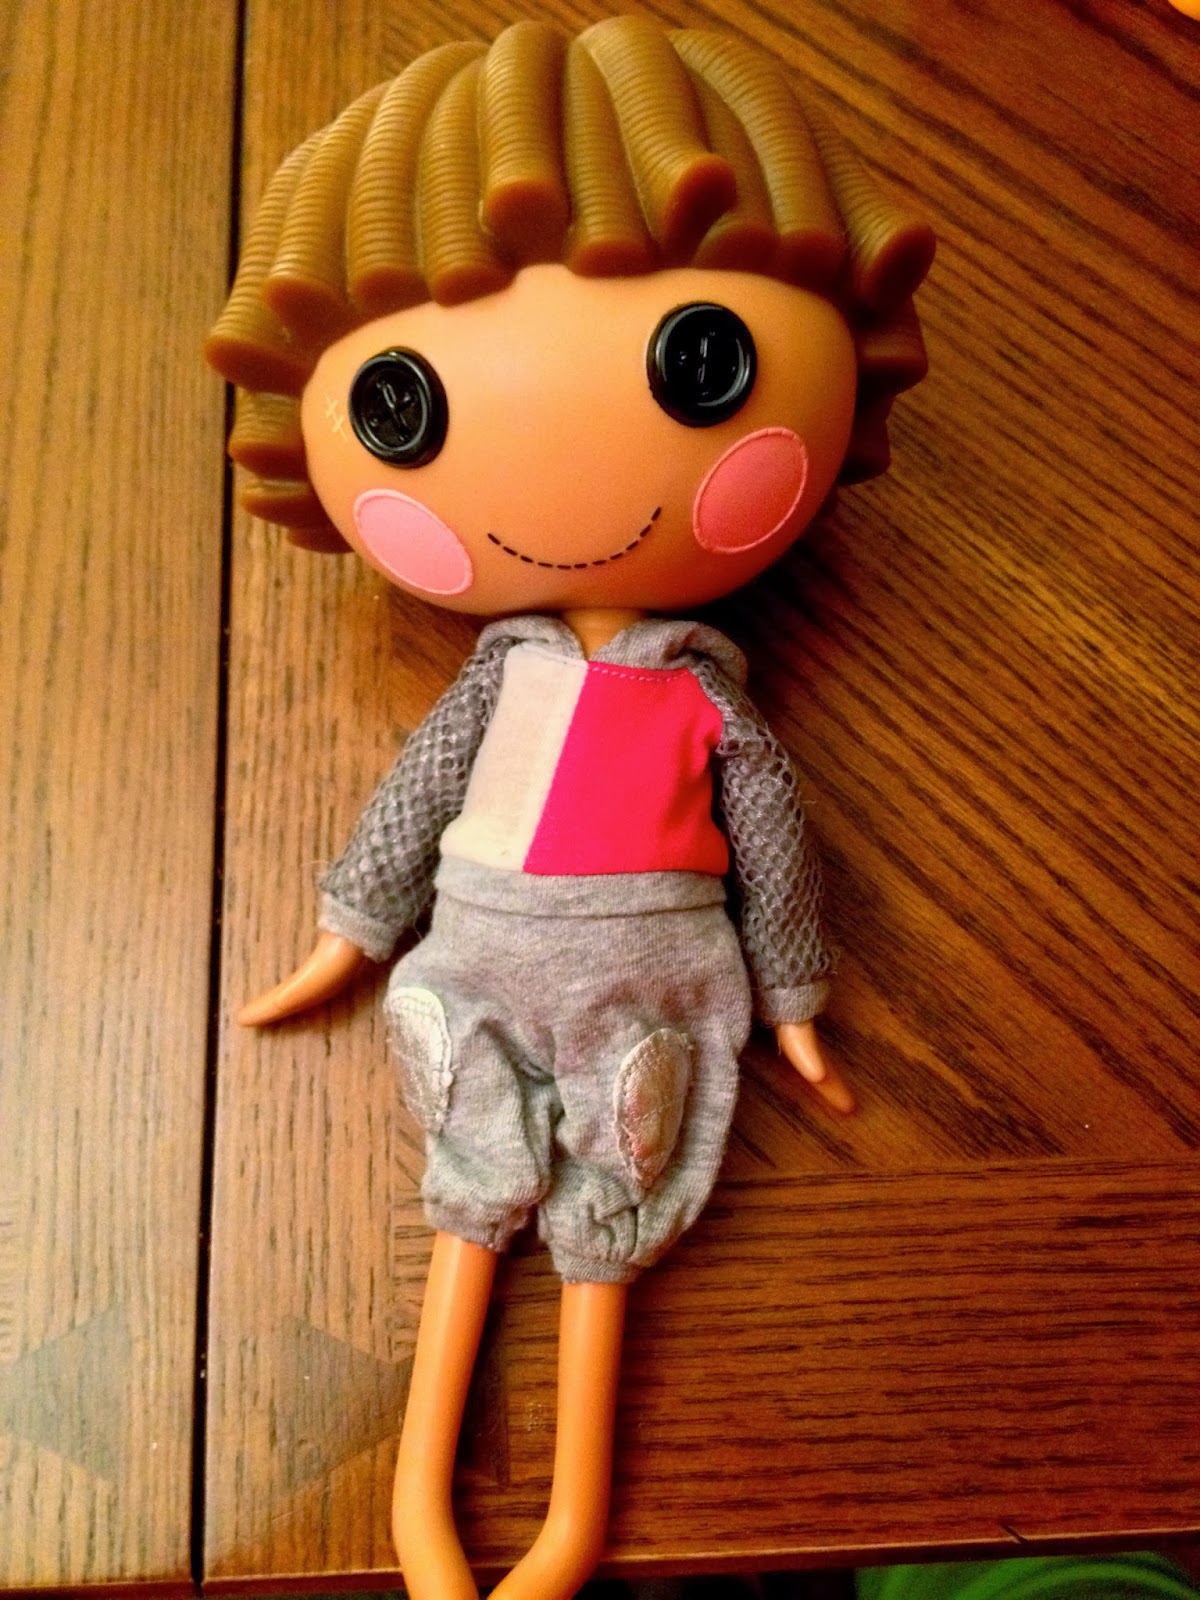
this next picture is really funny to me because I thought it was super cute when I opened it up on my computer and I involuntarily made a little cooing noise (which I do a lot at fics and other people's cecilos art) but my brother happened to be around for this particular noise and he gave me the weirdest most disturbed look and we started laughing and couldn't stop for about 10 minutes.
but no seriously, look how cute this picture is:

we took a lot of pictures of each of them separately in the parking lot too, but then I found that I liked the lighting and colors better as the sun was setting at home so I re-took them again.  and I used the car still because it's the best (read: only) way I could think of to prop them nicely.


Cecil had an incident on the way out the door for these photos in which he somehow managed to get magenta crayon lipstick (don't ask) all over his hair so I madly scrubbed at it with dish soap and it's only slightly tinted pink now in some areas.  it's okay.  it's ~iridescent~.  yes.

cuties in their little alternate outfits ^ (yes I painstakingly utilized the windshield wiper blade to get a height difference because it was 7 degrees out and by that time my fingers were so numb I figured I may as well take the time to be detailed before the sensation returned)  (also because I'm a nerd)

close-up of Cecil's poncho


close-up of the lab coat and illegal pens


I loved the way his hair reflected the blueish tones in this one.  also the way it looks like the profile picture of a hipster on an online dating website.  
so there you have it.  it took me a little under a month (25 days to be exact) start to finish.  36 days ago I had this idea, and now I am so proud of myself for not only sticking to a project (which is hard for me generally), but also for doing a thorough and detailed job.  here's some nice before and after pictures for comparison:


if anyone's been following my progress here, I hope you like them as much as I do!  if you've stumbled across this blog looking to work on your own custom Lalas, I hope maybe some of my blind stumbling has helped you figure out some basic do's and don't's.  (as they say: the best method of learning is from mistakes; they never specified precisely whose mistakes after all)  if you have any questions feel free to leave a comment and I can try to help you out.

thanks for stopping by either way!
goodnight, gentle reader, goodnight.

Friday, March 14, 2014

The Post with the Patterns!

First off, here's pictures of the shoulder strap, suspender setup I was trying to describe.
The stitch job is iffy because my machine doesn't like sewing elastic, but for doll clothes it works.

I finished the lab coat yesterday.
 

it was a whole lot of fudging everything, all the edges are sealed with fray check instead of hemming (because the muslin is so thin that hems would look crappy through the seams), and I literally made up the collar lapels as I went along.  I gave it a really generous bottom hem though because I wanted it to have some weight and also because the coat was really long.
I gave him some illegal pens made of embroidery floss because Carlos is such a rebel

The sleeves I left a little short because I wanted to be able to roll the long cuffs of his plaid shirt up over the coat sleeves.  

So now the moment everybody's been waiting for (I'm kidding, but not really kidding because before I started this project I scoured craft blog after craft blog and got excited when I saw Lalaloopsy patterns and disappointed when they all turned out to be dresses.  so yes, this would be that golden post I was waiting for) here are some scans of my patterns! 

I neatly traced around the edges and labeled them in the most legible handwriting I can attempt, but please keep in mind just how sketchy my sewing process has been.  these patterns are just the base and from here you may have to trim and cut and alter and adjust as necessary.  if you have a general knowledge of sewing basic clothes, then this should all be fairly simple to tweak.  

be sure to zoom these in to 100% before printing off.  also to note: I used 1/4" seams for almost everything.  


I couldn't get my scanner to not cut off 1/8" all around the paper, so just be aware of that with the edge pieces.  

if you have any questions about anything on these patterns, leave a comment here and I'll do my best to attempt to help!  

The dolls are both done now, and this weekend I should be able to get nice pictures of them to post. :]

Wednesday, March 12, 2014

furry pants!


I'm not in the best of moods today, especially to be doing Night Vale things, so please forgive me for the fact that this post is going to be really abrupt, straightforward, and to the point.

last Friday I finally got a functional pants pattern created.  I tested it on the furry pants, which is an interesting fabric actually.  I've never used it before, so I was surprised that the little bobbly dots are either punched in such a way or raised to the point that the surrounding flat fabric between has a lot of little holes through it.  So I found some unmarred stretches big enough for my flare pant pattern.  pants are hard enough in full-scale, so trying to come up with a pattern was a shot in the dark.

and hey on the first attempt it worked perfectly!
ignore the poncho the poncho is irrelevant for right now.  I had to hem the pants by hand, and they fit so perfectly and so snugly on his body that they hold themselves up.  he can sit in them without excessive bunching, and the shoes fit under them because the hems are really wide. 

okay now we can talk about the poncho.  
I used this pattern again and knit the whole thing in teal with the last row of knit stitches in orange and the garter hem in purple.  then I literally took a pen and drew on some tentacle-y (they look like flames but shhhhh they're tentacles) shapes on it and then learned to duplicate stitch!  two episodes of Bates Motel and the whole pattern was filled in!  so then I laced through the orange, tied it in the middle to look like a drawstring, and now it can tie on and off around his neck.
so from the back it looks more like a reverse cape
but from the front it looks pretty freaking awesome

then I took the pattern from Cecil's furry pants, cut down the flare a little bit, and made some denim jeans for Carlos.  
we couldn't find denim that looked light enough without looking crappy, but thankfully the denim I have can be turned inside out.  the inside is the perfect shade of light, and there's this stripe at the bottom edge that is the dark color of the outside and it was already frayed to the fixed edge, so I figured why not give him that instead of cuffs?  now as it turned out, his pants were a little more problematic.  the denim didn't want to crease, so when he sat down it bunched a whole lot at the thighs, so I literally took the jeans, flipped them inside out, traced around his little egg-like butt and down the legs and gave him rockstar skinny jeans.  

if you haven't figured out by now, my sewing technique is comparable to the fairies in Sleeping Beauty.

it fixed the crease problem, but also the waistband was a little baggy, so for his, I did have to take a thin ribbon of elastic and stitch it from his waistband over his right shoulder, across his back, and to the left side of his back waistband.  I don't have a better way to explain this.  just think farmer overalls with only one side done-up.  it keeps his pants up and that's what's important.  

today I'm going to remake his little shirt and hopefully get a lab coat done up for him too.  and then I'll be all done and ready to get some pictures of the two next time I get into town.  more on this when it happens.


Thursday, March 6, 2014

The Introduction to Coraline Gave Me Unrealistic Expectations About This

'this' in this context being doll clothing.  I didn't really know what to expect sewing doll clothes to be like, but I guess I didn't really expect it to be this.  I ended up literally just cutting off the too-small sleeves of Carlos's little flannel shirt, since the body seemed a pretty good fit (emphasis on seemed - we'll come back to that).  I cut a larger sleeve piece and tested it and it worked out actually pretty perfectly.  I also added a little collar (since at this point we hadn't discovered the brand new bottle of fray check in the sewing bin, I actually finished an entire little collar with clipped corners and everything) and some buttons just stitched on for style points.  My mom says I didn't poke the collar edges out satisfactorily and that it looks like the little scalloped edges of a girl's shirt.  I told her I don't actually care at all, I think it's cute.

So I was attaching the sleeves, and came across a definite problem.  Since I hadn't really finished the armholes, the sleeves were literally just tipped under, pinned to the bodice as the bodice was in turn pinned onto Carlos, and then I proceeded to stitch them on with a quilt needle, embroidery floss, and a highly questionable method.
just look at that high-quality finish.  if I ever do get the pattern pieces posted on here, they will not be accompanied by sewing instructions since my process involved such steps as "y'know he's not technically naked without a shirt..", "wait when did this whip stitch turn into outline embroidery?", and the timeless classic "screw it, they're doll clothes".  also because as you can see in the photo, the shirt magically fit really well until it decided to not fit well anymore.  I don't know if it was something about the sewing on of the sleeves or the collar or what, but I could hardly get it to fasten with a hook and eye and a single snap instead of a nice little two-snap setup like I had hoped.  I felt really bad, like I should remake the whole thing with proper pieces and a decent sewing process, but I'd already made an entire collar and sewed on buttons and whatnot so I decided to leave it.  besides - from the front it actually looks pretty fine, and he'll have a lab coat to cover the back anyway. 

(don't worry, my guilt will catch up to me in about 2-3 days and I'll end up salvaging the buttons and closures and remaking this in a proper size)

In other news, I really like how the plaid looks with his hair and skin color.  Like really like.  Much better than the original red plaid plan.  So now onto Cecil's clothes!

I drastically altered the pattern, adding a good 1/4" on both sides of the bodice, and almost 1/2" to the length since it's a tunic after all.  The sleeves I completely started from scratch to give them flare.  I also made a cool swoopy sweetheart neckline to it.  

I won't bore you with the sewing details, but I did do all my hems in a decorative topstitch, which was equal parts a really good and a really bad idea.  On the one hand, they looked really cool where they worked.  On the other hand, the hems were so tiny that the machine frequently bunched all the stitches up and then leapt half an inch ahead.  But overall it looked I think...pretty good anyway. 
now, while Carlos got the tiny fitted shirt, Cecil's is so huge it's practically a dress.  (my mom has informed me of this at least six times now).  Whenever my motivation to fix Carlos's little shirt arrives, I may take the opportunity to sew up the side seams of Cecil's tunic just a little bit further in to decrease the excess flare.  But at least his meets (and overlaps about 1/2") in the back. 

The decorative stitching also messed up the nice little sweetheart neckline and also the sleeves are a bit longer than I'd hoped, but ah well.  I think it's adorable.  I'm gonna make him a little braided belt of embroidery floss later today.  but for now: aren't they a couple of cuties?

Now to quote what my current favorite movie: where are their paaaaaants?
for the answer to that exciting question: stay tuned!


Monday, March 3, 2014

The Time Matte Varnish Completely Messed Up My Perception of Reality

I was told by the few sites I found for Lalaloopsy customizations that the best thing to do after painting a doll is to spray it with matte varnish.  Apparently it's what the doll manufacturers use to finish the dolls in fact.  So I picked up a can of spray varnish for $3 at Menards and got to it in the basement.  Now, matte things mess with my head.  I mean, you spray a whole bunch of stuff on and it actually seems to dull the color.  I don't know why my brain can't comprehend this, but I can't tell you the number of times I'll put matte coat on my nails and just sit there rubbing at it after it dries trying to understand the universe.

Anyway.

As far as the dolls went, I did 3 coats in quick succession (the canister said to spray, let it dry for 90 seconds, and then spray it down again) and then I let them dry for about 5 minutes and ta-da they were dry and nice.  It said to let it dry for 24 full hours before giving it to small children, and I am 19 but I consider myself a small child in most aspects so I allowed it the full time to dry.  (I'm kidding, I mostly didn't want to get anything stuck to them in the case I found a little pool of still-undried varnish.)  But here they were all painted and finished!

complete with a comparison to the originals
 I will add a little disclaimer here that the varnish 1) freaked me out and 2) it did actually change the texture of the bodies.  Instead of the sort of rubbery feel to the arms and legs, it gave them more of a hard plastic feel.  Not that I mind, but in case anybody is reading this blog looking for advice on their own customizations.  Especially if you're giving the toy to small children, I think there's probably a lot of things you might want to consider first, this being one of them.

Now that the whole varnish thing is over and done with, on to the clothing!
So I have never made doll clothes before in my life.  Never for my American Girls, never for Barbies (though my mom did make a tent for Barbies once.  and sleeping bags.  and a girl came over to my house for a sleepover, got jealous, and sat on the tent.  12 years later and you can see I have never let this incident go.)  I have no idea how to make doll clothing, and all the patterns for Lalas that I can find online are (predictably) fluffy dresses.  Or at the very least they're all sleeveless.  I need the opposite of these things.  So it's basically all trial and error from here.

I went to Jo-anns with a 40% off everything coupon and this is what I came up with.
I was going for some of that shaggy curly super-soft fabric for the furry pants, but our Jo-anns is tiny and lame and I had to dig for this one as it was.  It's not as painfully neon in person.  I actually went in looking for the brightest orange I could without going full-out blacklight-reactive hunter.  It looks a little hunter-esque in the shot, but actually it's the most perfect shade of orange I could have hoped for.  Also I've always wanted an excuse to use this wobbly soft fabric and it's so very Cecil that it's perfect.  
The plaid is for Carlos because I think we know he wears flannel canonically.  Or plaid.  I forget which, so I went with both.  But I always always see him drawn in red plaid which we might be told it's red too now that I think about it, but I like to think he's allowed to shake things up a bit sometimes.  so super-soft purple plaid flannel it is!  There's also some off-white muslin for the tunic, and some stark white muslin for the lab coat in there.  The other fluffy looking stuff is for a completely different project involving Star Wars and guitars.  Do not ask.  Do. not. ask.  

Bonus photo of some other fabric I found on the prom dress rack that is also so painfully Cecil, but also so painfully expensive - 40% discount or not.
yes those are tiny rhinestones on each tiny camo ruffle
My mom is really good at sewing.  She's never made doll clothes either, but we figured we've freehanded patterns for antebellum ballgowns before, so what's a few doll clothes?  We vastly overestimated the required lengths of fabric for it all as well, so I figured it's okay to trial and error it with the actual fabric in the off chance that we get lucky. [muffled Daft Punk begins playing in the distance]
here we have vague attempt #1 at a flannel shirt.  The pieces were drawn out on paper prior to cutting and when (if) I figure out a good pattern for this stuff I'll be sure to scan it in here, again in the case that any readers might want to try making their own Lala clothes.  unfortunately this pattern was not functional since his hands are wider than his noodle-y little arms and therefore cannot fit into the sleeves once we sewed them up.  I plan to try again this afternoon with a bit of an enlargement to the pattern.  

Meanwhile Cecil had slightly better luck in the clothing department. 
here we have some scrap yarn in purple, teal, and orange.  (leftover from Vanellope Von Schweetz legwarmers, a Monsters Inc. sweatervest, and a Charmander plushie respectively)  I've never knit doll clothes before either, but it's a poncho - how hard can it be, really?  These are the smallest needles I had (2.5 mm) which were only .25 mm larger than the pattern called for.  Oh, by the way I used this pattern and sized it down to 27 stitches to start off.  I also put the suggested YO holes in the third row for a drawstring and followed their color pattern, but sized down by 1/2 (ex: they suggest 10 rows of a color, I did 5).  The results are as follows:
now don't get me wrong, I love it - I really do.  But I think I'm gonna toss it and start over and I'll tell you why.  I really loved the stripey color pattern, but I feel it didn't do an accurate job of being as weird as I would like.  Also I don't like that I put the row of orange at the top if I wanted to make the drawstring orange.  My blue yarn is also a wool blend, so it knit up really tightly into a solid.  Like.  We're talking posable poncho here.  I dug in my Doctor Who yarn bin and found some Caron yarn in a shiny teal, so I think I'm going to remake it in that since it'll be more even and a little looser and drapier.  (I know, I know, all these yarns are way too thick to be using on this but I'm broke so it's just gonna have to happen this way.)  Also I would shorten it to the length of the last thick teal row I think, and then do the BO so that it's not as long.  My mom thinks it's really feminine, but since I think Cecil wears whatever the heck he wants, I'm not too concerned.  What I am concerned about is that it isn't actually as weird as it could be.  So I'm considering this:

Make the whole poncho in teal with no color changing except at the CO, BO, and the bottom row of orange (which would also decrease the mess of ends to be sewn in), and then I'd duplicate stitch some kinda tendril-ey, sort-of-tentacles climbing up from the BO edge.  it would be nice and Night Vale-ian instead of just being clashy.  I've never done duplicate stitch though so it would also be a challenge and I'll probably regret the decision.  Which of course means that I'm going to start it immediately.  


Thursday, February 27, 2014

Cecil part 3 - stories of the stars (aka mostly weird headcanons about Cecil's tattoos and then a lot of pictures)

So the hair took...well it took from Tuesday to Wednesday morning.  And then last night I decided to just take the plunge and do his tattoos.  So here's some fun headcanon stuff.  If you don't care, feel free to just go look at the tattoo pictures.  Spoiler alert: they're constellations.

Bit of a background headcanon to my tattoo headcanon.  Night Vale is unstable, and always changing.  Everything is constantly in a state of flux - the streets change on a regular basis (it's more a weekly schedule than anything), things disappear and reappear arbitrarily, and nothing is constant.  In that vein, Cecil's tattoos.  I think they are sentient and do move, but not always, and certainly not very much.  I think they're bashful, and they prefer to not be touched, or even really seen as much as possible, so they tend to shrink away from people (except Carlos, who they like)  Of course Cecil does have some measure of control over them too.  But here's where I think the most drastic "movement" occurs: I think they change either daily or just sporadically.  One day they're tribal, the next they're smoky shapes that drift, the next they're geometric, sometimes they're tentacles, other times they're standard vintage designs.  When I first saw astrogyaru's constellation Cecil I just added that onto the list of things Cecil's tattoos definitely change into.  and then as I decided to do a Lala, I also decided constellations are also probably the only form of tattoos I could give him that wouldn't a) completely suck and b) have no relevance.  It also fits in well with the idea that Cecil has three tattoos that he did not get done himself at the local parlor.  Now for pictures to describe what those three are and then which constellations I put where and why.

The three tattoos Cecil did not get done, are an eye on the back of his neck and the moon on the back of each hand.
do you appreciate how hard it was to resist the temptation to make this a Sheikah symbol?
this one appeared the day his mother disappeared.  he doesn't have a third eye in his forehead, because this is how he sees the town.  in my deity!AU it's the source of his omniscience and the mark of his power.  in my normal hc, he uses it to "feel" people's presence, by which he can almost tap into their existence, feel the things they feel, see the things they see, sort of read their minds. (A Story About You, yeah?)  he also sees emotions as color auras around people (see what I mean about colors?)  All of these abilities slowly culminated until he was 15 and his mother left and he woke up with this mark that synthesized all his abilities.  he can make this one move, but left to itself, it stays at the base of his neck where he keeps it pretty covered with his clothing. 


on the back of each hand, he has the phases of the moon working from the equinoxes in opposite directions of the year.  most of his doubt and mistrust of the moon comes from the fact that he doesn't know why he has these marks.  (in the deity!AU it's so he can keep track of controlling the flow of time itself, the gravitational stability, and the balance of life in the desert)  in my normal hc, the marks help him read the stars to predict the future which is a trick he learned from his mother, and these enhance his ability.  he doesn't read them often because he likes to be surprised by the events of the present, but on the occasions that he does read them, he is yet to be proven wrong.  (he also glimpses the future when he hiccups but that's irrelevant) click here for a fun little bonus comic I drew that I actually do like about him reading the stars.  

So now you see why the constellation thing is pretty cool, right?  It fits in perfectly with the hc I already had.  Now, I am super intrigued by the creativity behind astrogyaru's designs.  I even asked once for a reference of them to see the full set and why they chose the constellations they did.  For my little Cecil however, I chose an entirely different set of stars to paint (the stars in glow in the dark white, the lines connecting them in glow in the dark lavender) and golly gee does he glow!  so here we go.


so this is the constellation Horologium, the pendulum clock.  because all the clocks aren't real.  
 
this is Mensa, the table mountain because mountains aren't real either.

this is Aquila, the eagle because it's the closest one I could find to a bird of prey (also some discrepancy on how it's drawn out which is why it has a different fancy comparison picture. I liked this way better than the other method)


this is Microscopium, which as you might have guessed, is a microscope because ~science~  Again with the discrepancies - some people connect the top two stars into a box, but I think that's a little boring (I guess accuracy < my personal enjoyment now?)
the last one on the front is Gemini, which if you don't know Gemini then we're in serious trouble (it's literally the only constellation that even resembles what it's supposed to be)  I included it not because it's Cecil's star-sign, but because of the whole Kevin/Cecil doubles thing.  also because it was really fun to draw.
Canis major, the dog.  Who is absolutely not in the dog park.  And is probably also just a plastic bag drifting by on the wind.  Again: nobody draws this one the same, there's like literally zero consistency and had I found this particular image of it earlier I probably would have used it but whatever, I went with this one version on nasa's kids website so yeah mine looks like a Tim Burton dog. 

this is Lynx, the closest thing to a cat, which I chose for Khoshekh who is probably at least remotely close to being a cat himself.  
Cancer, which is my Cecil's star-sign. (my Carlos is a Virgo) (again an arbitrary decision I made based on plot convenience, and the personality traits they both display most frequently)  
the last tattoo is Chamaeleon, the chameleon.  Remember about the colors?  Remember how everything in Night Vale is constantly changing?  That's what spurred this decision.  Again people are always drawing it differently, and again if I had seen this one first, I would have gone with it cause it kinda looks like a boxy object with a line  a reptile poking its tongue out. 

Anyway, I'd just like to point out once more that the credit for the inspiration of this particular tattoo idea belongs to astrogyaru, I simply took it and applied my own twist because I have a longstanding love of stars and constellations and I kinda instilled that into my Cecil too.  Though Night Vale stars are different than our stars, and his favorite constellation is the Flower Crown of the Goddess.  (I actually did think about just using the fictitious constellations from my fic, but then it would be like an inside joke with myself and I would feel really lame trying to explain it to other people.  this way I at least can tell them they're actual shapes from ancient star charts.)

Feels good to get the blog all caught up on progress.  Now I'm awaiting a nebulous trip to town to get fabric (possibly tomorrow?) and then the daunting task of learning to sew doll clothes.  At least the poncho I can probably do freehand (I crocheted a Merida Lalaloopsy completely from scratch with no pattern once) but the sewing...I'm better on a large scale than a small scale I fear.  But we shall just have to give it a shot and see I suppose!